Saturday, November 15, 2008

CEO National Conference 2008


CEO National Conference 2008

I attended the CEO National Conference for the first time this year from November 6-8th.  Overall, the conference was very educ
ational and exposed me to a lot of different successful entrepreneurs. 

The top two topics were High Heels: How to Advance In Business Without Losing Your Skirt and Mistakes Learned The Hard Way: 10 Things Not To Do When Starting Your Own Company.  For High Heels, I learned that a women needs to teach people how to treat them and there are three ways in doing so through: dress, talk and action.  This knowledge will help me in the future by knowing the correct way to dress, talk and act in order to be respected in the business world.  Secondly, during the 10 Things Not To Do session I learned how to avoid practical mistakes such as, constructing the correct team to make a business the strongest, equality is beneficial, and an entrepreneur must be very passionate about their business in order to succeed. This information will help me in the future because by having the correct team I can save my business a lot of money.    


I also attended the elevator pitches for round one and the final because Katie Racey, a junior at Grand Valley State University, participated.  Through attending the pitches I learned how to improve my elevator speech, which will ultimately help me gain support and capital from potential investors.  


I benefited from the conference because of the discussion of the experience from current successful entrepreneurs and the experience of being with fellow entrepreneur minds.  I can use this information to start my business because it not only strengthen my probability of succeeding but it also helps me gain a support group on staying persistent with “sticking to it” during rough times. 


Monday, November 3, 2008

Photography On A Strict Budget

Since I am a college student, I am currently short on funds due to college expenses.  Therefore, this article really helped me with techniques I can use with only one light source to make successful portraits.  It will be a great way to get started practicing while still on a strict budget!  


This article is part of the ‘Portrait Lighting For Beginners’ series. This series is meant to help you go from a beginning photographer to making beautiful portraits.

Mom and babyWhy start with just one light? Because you can get amazing portraits, that’s why. Did I mention less equipment, less complication, less cost, and less time? Oh, and once you’ve mastered portraits with a single light, using more lights is pure gravy. I have lots of lighting, but I break out a single light more often than I get out multiples. Many of you reading this have yet to really get into this lighting stuff, so you probably only have one flash. So it makes sense that the first article where we get into lighting setups would focus on portraits with just a single light.

The first thing you should do is read Metering For Flash if you haven’t already done so. This will teach you the process for getting the exposure right with the flash and camera in manual mode.

What Look Do You Want?

The first thing to do before taking a picture is decide how you want the lighting to look. InStudio Accessories you learned about some of the light modifiers available to help you change the quality of the light. So decide right now if you want the light on the subject to be hard with sharp transitions to shadows, or soft and supple.

  • For a hard look, you’ll want to simply point the flash directly at the subject.
  • For a soft look, you can use an umbrella, softbox, brolly box, scrim, or even point the flash at a nearby wall and turn the wall into a big light source.
  • Just remember, the larger the light source appears, the softer the light will be.

Light Position

HandsNext you want to figure out where to put the light. There are a few things to keep in mind here.

  • The angle will of course very much change the look of the shot and determine how much of the subject is lit versus in shadow. Experiment like crazy to see what you like best.
  • The distance between the light and the subject will affect how much light reaches the background. This is explained in The Laws of Light. Basically, if you want a darker background, you’ll want to keep the light close to the subject. If you want to lighten the background, you’ll need to move the light further from the subject.
  • Moving the light further away makes the light source appear smaller to the subject, and so the light will become harder. Moving the light source closer will do the opposite, making the light softer.
  • All these things work in concert. Making any one change affects the others, so experiment to see how moving the light around changes the look of your photos.

Filling In The Shadows and Adding Accents

As a beginner, it’s easy to think that with one light you can only make the light fall on the subject from one direction. Not so with a little creative thinking. With that one light you can fill in the shadows, add hair lights, and more. Your primary weapon to start with is the reflector. If you don’t own a store bought one, you can make one. A few household items come to mind:

Baby Closeup

Foil placed camera right


Lightening The Background

Taking the last section a little further, you can easily lighten the background without blowing out the highlights on your subject. You can even make the background completely white. Mom and babyThe key is to use a scrim. A scrim is just a piece of translucent material that will diffuse the light, but at the cost of losing light.

So you place a store bought scrim (they come with those 5 in 1 reflector kits) between the light and the subject. You can also just hang a white sheet. But, make sure that the light still falls directly on the background. What happens is that the light be darker on your subject and lighter on the background. When you then adjust the exposure on your subject to compensate, the background becomes lighter! The added advantage is that the scrim is now acting as the light source on your subject. This means the light source is big, and big means soft.

Camera Settings and White Balance

Dad and son

Portrait outtake,
just for fun.

Using flash can sometimes cause your camera to behave a little strange. This is especially apparent if you’re using studio lights with incandescent modeling lights. You see, the modeling bulbs in the strobes have a much warmer color temperature than the strobe bulbs do. If your camera is set on auto white balance, it will balance to the incandescent light. When you snap the picture, the photos will often times look blue because daylight balanced light from the strobes takes on a blue color when corrected in the camera for incandescent light.

How do you fix this? Just set your camera’s white balance setting to “flash” and you’re set. Or, if you’re shooting in RAW, then you can easily change the white balance after the shot if you forgot to before hand.

Sunday, November 2, 2008

Stunning Portrait Photographs!

I really enjoyed this article because it really helps with new ideas on taking portraits.  The images were also very impressive and interesting!  The link is: http://digital-photography-school.com/blog/tips-portrait-photography/

10 More Tips for Stunning Portrait Photography

Yesterday I shared 10 Ways to take Stunning Portrait Photography. We covered everything from altering your perspective as a photographer, to experimenting with lighting, to shooting candidly.

Today I want to continue on the same train of thought with 10 more tips for adding a little spice to your portraits.

11. Frame Your Subject

Framing is a technique where by you draw attention to one element of an image by framing it with another element of the image.

Framing gives an image depth and draws the eye to a point of interest in the image.

You could do it by placing your subject in a window or doorway, have them look through a small gap or even use their hands around their face. See more examples of framing in photography here.

portrait-framing.jpgImage by darkmatter

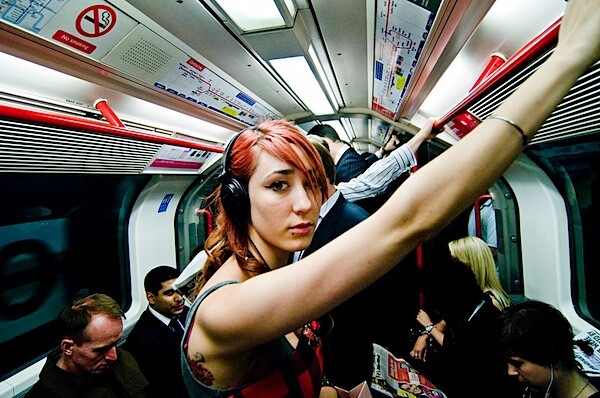
12. Go with a Wide Angle

Shooting with a wide angle lens attached to your camera can help create some memorable shots when you’re doing portrait photography.

At very wide focal lengths you can create some wonderful distortion. It might not be the type of shot you take of your wife or girlfriend (unless she’s in a playful mood) but using these focal lengths will enlarge parts of the face or body that are on the edge of the frame more than what is in the centre.

It can also give a wide open and dramatic impact when your subject is in an impressive setting.

portrait-wide-angle.jpgImage by paulbence

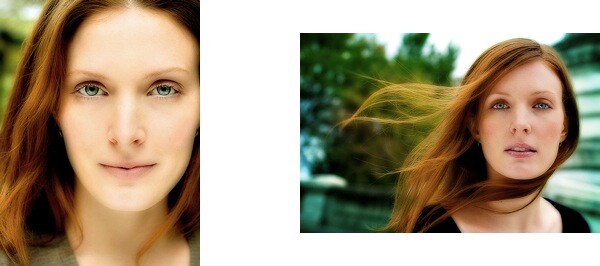
13. Play With Backgrounds

The person in your portrait is the main point of interest - however sometimes when you place them into different contexts with different backgrounds you can dramatically alter the mood in a shot.

Sometimes you want your background to be as minimalistic as possible.

portrait-background.jpgPortrait by akbar1947

While other times a dramatic or colorful background can help your subject really stand out.

portrait-backgrounds.jpgPhoto by paulbence

The key is to experiment.

14. Change the Format Framing

Many photographers get stuck in a rut of only ever shooting either in ‘landscape’ (when the camera is held horizontally) or ‘portrait’ (when the camera is held vertically) modes. Look back through your images and see which one you use predominantly.

Just because a vertical framing is called ‘portrait’ mode doesn’t mean you always need to use it when shooting portraits. Mix your framing up in each shoot that you do and you’ll add variety to the type of shots you take.

portrait-horizontal.jpgImage by bikeracer

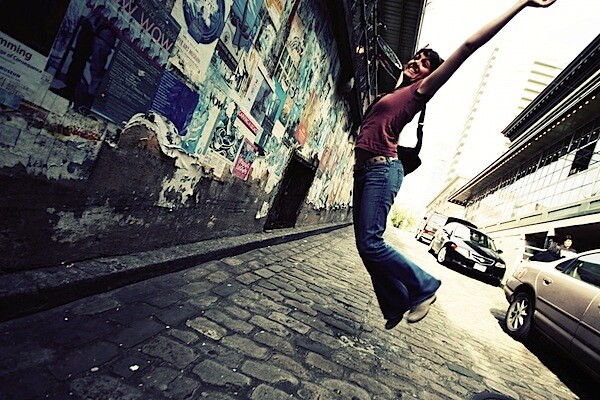
15. Hold Your Camera on an Angle

Horizontal and Vertical framings are not the only options when it comes to shooting portraits. While getting your images straight can be important in when shooting in these formats holding your camera on a more diagonal angle can also inject a little fun into your images.

This type of framing can add a sense of fun and energy into your shots. Just don’t ’slightly’ do it or you’ll have people asking themselves if you might have mistakenly held your camera crooked.

portrait-angle.jpgPhoto by puja

16. Take Unfocused Shots

As photographers we have ’sharp focus’ drummed into us as an ultimate objective to achieve in our work - but sometimes lack of focus can create shots with real emotion, mood and interest.

There are two main strategies for taking unfocused images that work:

1. Focus upon one element of the image and leave your main subject blurred. To do this use a large aperture which will create a narrow depth of field and focus upon something in front of or behind your subject.

portrait-unfocused.jpgPhoto by Jeff Kubina

2. Leave the full image out of focus. To do this again choose a wide aperture but focus well in front or behind anything that is in your image (you’ll need to switch to manual focussing to achieve this).

These kinds of shots can be incredibly dreamy and mysterious.

portrait-out-of-focus.jpgPortrait by peskymac

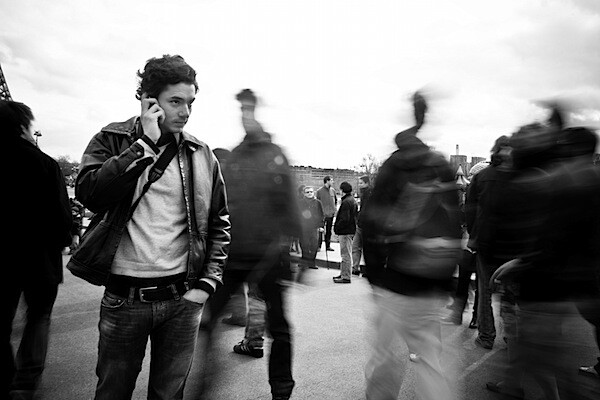
17. Introduce Movement

Portraits can be so static - but what if you added some movement into them? This can be achieved in a few ways:

portrait-movement-1.jpgPhoto by Michael Sarver

  • by making your subject move
  • by keeping your subject still but having an element in the scene around them move
  • by moving your camera (or it’s lens to achieve a zoom burst)

portrait-movement.jpgPortrait by philippe leroyer

The key with the above three methods is to use a slow enough shutter speed to capture the movement.

The alternative is to have your subject obviously move fast but to use a shutter speed so fast that it ‘freezes’ their movement.

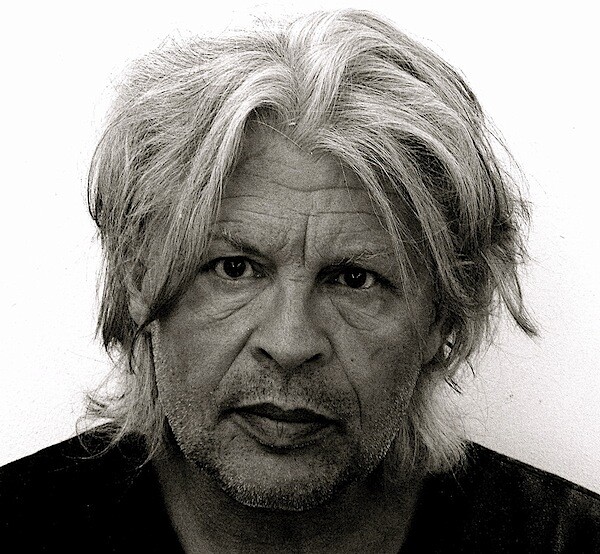
18. Experiment with Subject Expressions

In some portraits it is the expression on the face of your subject that makes the image.

Get your subject to experiment with different moods and emotions in your image. Play with extreme emotions

portrait-smile.jpgPortrait by carf

But also try more sombre or serious type shots

19. Fill the Frame

One way to ensure that your subject captures the attention of the viewer of your portrait is to fill the frame with their face.

It’s not something that you’d do in every shot that you take - but if your subject is the only feature in the shot - there’s really nowhere else to look.

portrait-fill-frame.jpg

Portrait by kkelly2007

20. Find an Interesting Subject

I have a friend who regularly goes out on the streets around Melbourne looking for interesting people to photograph.

When he finds someone that he finds interesting he approaches them, asks if they’d pose for him, he quickly finds a suitable background and then shoots off a handful of shots quickly (if they give him permission of course).

The result is that he has the most wonderful collection of photographs of people of all ages, ethnicities and backgrounds.

While many of us spend most of our time photographing our loved ones - perhaps it’d be an interesting exercise to shoot interesting strangers once in a while?

portrait-interesting-subjects.jpgPortrait by .mushi_king

From Rags to Riches...


Our entrepreneurship class went to Founder's Brewery Company in Grand Rapids, Michigan to hear about their story.  

Currently Founders is ranked the 7th best brewery in the world and 3rd in the United States.  But they weren't always so successful.  

The owners decided that they had a passion with brewing beer when they were attending college.  Then Dave's, one of the two owners of Founder's, girlfriend at the time said "You are always talking about opening a brewery so either do it or stop talking about it!"  So they decided to give it a try after a few years of being unsatisfied with their current careers.  

Dave said that the most important thing to know is that when you are an entrepreneur you are going to work long hours.  He never realized how intense this statement was.  There was a time when him and his partner did not get paid for seven months straight.  They were so low on 
money that they would have to steal toilet paper from their landlord.

Then they realized that they needed to make something different to make them unique and ahead of their competition.  So they began to completely focus on the product, everything was about the product.  Then they would worry about the rest later, so they started to brew the best high quality beer.  And the rest is history as they say...


So the most important things that I learned from the Founder's Brewery story are:
- times are going to be tough so prepare to be able to finance yourself and prepare for the worst
- you HAVE to make yourself completely different from your competition
- make the best product/service possible

So go check out Founder's because remember they have the third best brews in America! 
I recommend the Cherry Ale! : ) 

www.foundersbrewing.com